

Look Mum, I built a GPT-3 Webapp
AI at your fingertips | Let GPT-3 create travel iternaries | My first e2e Project

Hey there 👋 I am leveling up my development game by LEARN.BUILD.SHIP.GROW in public.
I am recently stepping up my software development game. And I do so by building in public, sharing my experience, insights, maybe getting some useful feedback or inciting interesting conversations. In any case, I want to step away from only doing tutorials or building on localhost.
So here we go!
TL;DR -- I built a website with
NextJSthat calls openai's API to GPT-3 to give travel recommendations. I used AI to generate website assets and learned a lot about.css, especially gradients.
You probably haven't missed the chatGPT craze recently. Well, GPT-3 is what chatGPT has under the hood before someone specifically tailored it towards chat applications. Since I think these models are cool, I've set myself the goal to build an application that uses openai's GPT-3 to perform some task. Since I am tired of being stuck on localhost, the main challenge was to build an end-to-end application and host it somewhere.
Note: The whole thing was inspired by this online tutorial. It's great and does not take long. So check it out if you are interested.
What's a Transformer?
GPT-3 is the third generation of openai's Generative Pretrained Transformer. These models predict the next likely word in a sequence.
If you are interested in some of the technicalities of how they work, the next box is for you (and if that's still not enough, click the links and read the papers).
The transformer is a deep learning architecture that consists of encoder and decoder layers. It was developed by a research team at Google in this paper.
Encoders
Encoders encode (duh!) a target sequence into a memory representation. In NLP use cases the target sequence is a vector representation of words.
The encoders consist of an attention block that learns the relative importance of the words and a feed-forward block which learns their memory representation
Decoders
Decoders then compare the memory with another target sequence for gaining experience for future iterations. They consist of three blocks. First, a self-attention block for the memory (the encoder output). Second a memory-target attention block that learns relative word importance. Third, a feed-forward block to gain experience.
Feed-Forward
Feed-forward blocks are two fully connected layers where every neuron in the input layer is connected to every neuron in the output layer.
Attention
Attention is a mapping between two sequences of tokens to establish relative importance between-element pairs. If both sequences are the same, we have self-attention. The algorithm establishes attention by selecting a query vector from the input sequence. Then we take key vectors from the second sequence tokens and compute weights by taking their dot-product. Then a value vector is computed as the weighted average of the input sequence vectors - the attention, available for further processing.
The idea behind this is that every token in the input sequence can take as much or as little information from the second sequence as desired. Training of the networks chooses the optimal attention.
The attention mechanism processes a sequence in parallel. This parallelization allows faster training when compared to RNNs which require sequential input.
Another cool explanation is here and a more mathy one is here.
None of this tech-magic is in any way my contribution. But I think it's cool what applications you can tinker together building on top of them!
Sketching out the Idea
Unlike chatGPT, you can use GPT-3s APIs with 18 USD free credit if you sign up on openai's website. It offers a "playground", a user interface for typing prompts for which GPT-3 then calculates the next word and next word and next word and so on until it (hopefully) completed the task you prompted it to.

The GPT-3 playground
This technique is called zero-shot learning since GPT-3 tries to solve the task with no examples. If you give a few, it's called few-shot learning. So giving more shots, or in general improving the prompt can improve the performance of our application.
We can also finetune some of the parameters. First of all, we can select the model. text-davinci-003 is the 175 billion parameters one. It's the biggest transformer to date. The temperature setting allows us to dial the randomness of the output. GPT-3 predicts the most likely next word in a sequence. A higher temperature allows the model to deviate from this selection allowing for more "creativity". At a zero temperature, the same prompt always results in the same output.
My goal was, to use GPT-3 for travel recommendations. I wanted a user to input some conditions for a trip into a search field and have GPT-3 do its magic. After some trial and error, I ended up with the following prompt:
Task: Give me a travel itinerary with locations and activities for travel according to the following specifications.
Specifications: <USER INPUT>
Itinerary:
where the specifications are the user input on my frontend.
This seemed to perform the best, even though I experimented with different approaches such as a mock conversation with a travel agent.
Building
Nice, so the proof-of-concept is there. Let's get building!
Setup
I am building with nextJS a framework built on top of react. It's easy to set up the project with the following command:
npx create-next-app your-next-app-name
I got to work right away. The whole application grew organically. While I had a components subdirectory with files containing for example the responses.js component containing a grid of trips returned so far, the inspireSearch.js containing the search bar as well as a footer.js and header.js, I did not really spend any time organizing files.
When I refactored my code from using react states to redux, I faced quite some complexity. Now while writing this I thought there must be a better way for folder structuring. However, I found this article from the react FAQs warn about too deeply nested folder structures and also recommend not spending more than 5 minutes on overthinking folder structures.
So maybe refactoring is just complex after all ...🤔
Calling openai
My backend is fairly simple. (Tbh, since its in the /api folder in the NextJS app, I don't even know if I can call it a backend).
Nonetheless, for the openai API call, I first run
npm install openai
Then, I can import the necessary modules
import { Configuration, OpenAIApi } from "openai";

const configuration = new Configuration({
  apiKey: process.env.OPENAI_API_KEY,
});

const openai = new OpenAIApi(configuration);
and use the following function in the REST-API call from the frontend
const tripBaseCompletion = await openai.createCompletion({
    model: "text-davinci-003",
    prompt: `${tripPrompt}`,
    temperature: 0.83,
    max_tokens: 200,
  });
where the tripPrompt is a text string that combines my prompt with the user input.
tripBaseCompletion then contains the response of GPT-3 which the REST API returns to the frontend.
The prompts and returns of the GPT-3 API are also saved to a mongoDB database.
Making things look nice
While there was a little more to the backend which I am omitting here my main focus was on the frontend. I wanted the interface to look nice. Coincidentally, I spent a big if not the biggest chunk of my time on my stylesheets.
.CSSing my ass off
.css feels like the type of thing that should not be too complicated, but I was googling how to center a <div> quite some times (yeah, yeah, lazy joke, except it's not and I did 🤷).
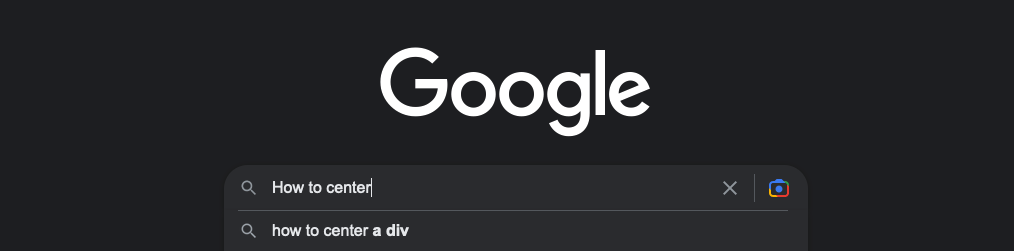
Totally not a staged screenshot of me figuring out how to center a <div> for the nth time.
One thing I really used a lot in this application was gradients. Most prominently in the header and footer, but also a lot of overlaying images (Images ... more on that later)

Screenshot of the header gradient.
The gradients were implemented as a background image like this:
.class {
  background-image: linear-gradient(
    0.25turn,
    rgba(63, 135, 166, 1),
    rgba(235, 248, 225, 1),
    rgba(246, 157, 60, 1)
  );
}
The first argument specifies a rotation so that the gradient does not run from left to right which I found less visually appealing. Then the next three arguments specify the colours the gradient matches at certain points. In this case at the left, middle, and right, but you can have any number of colours (>=2) you want.
Speaking of gradients. There is another around the search bar and I've spent a criminal amount of time on it. It even lights up, when you focus within it 🤩.

A gorgeous 3px border around the search box lighting up once you click within it. And it is gorgeous - no debate on that.
I was in way to deep. Why?
It turns out you cannot have gradient borders around a <input> and then change their opacity on :focus . So I introduced a <div className="border-wrapper> div with a border-wrapper class name. with a 3px padding around with a gradient background that contained the <input> and lights up on :focus-within.
.user-input-border-wrapper {
  height: 100%;
  padding: 3px; /*Border width with respect to user-input-border-wrapper */
  border-radius: 100px;
  background-image: linear-gradient(
    0.25turn,
    rgba(63, 135, 166, 0.25),
    rgba(235, 248, 225, 0.25),
    rgba(246, 157, 60, 0.25)
  );
  box-shadow: 0 10px 20px rgba(0, 0, 0, 0.25);
}

.user-input-border-wrapper:focus-within {
  background-image: linear-gradient(
    0.25turn,
    rgba(63, 135, 166, 1),
    rgba(235, 248, 225, 1),
    rgba(246, 157, 60, 1)
  );
}
Now, this code seems innocent but it took a long time to figure out that what I wanted to achieve was not possible with the border property.
Sourcing Assets from Lexica
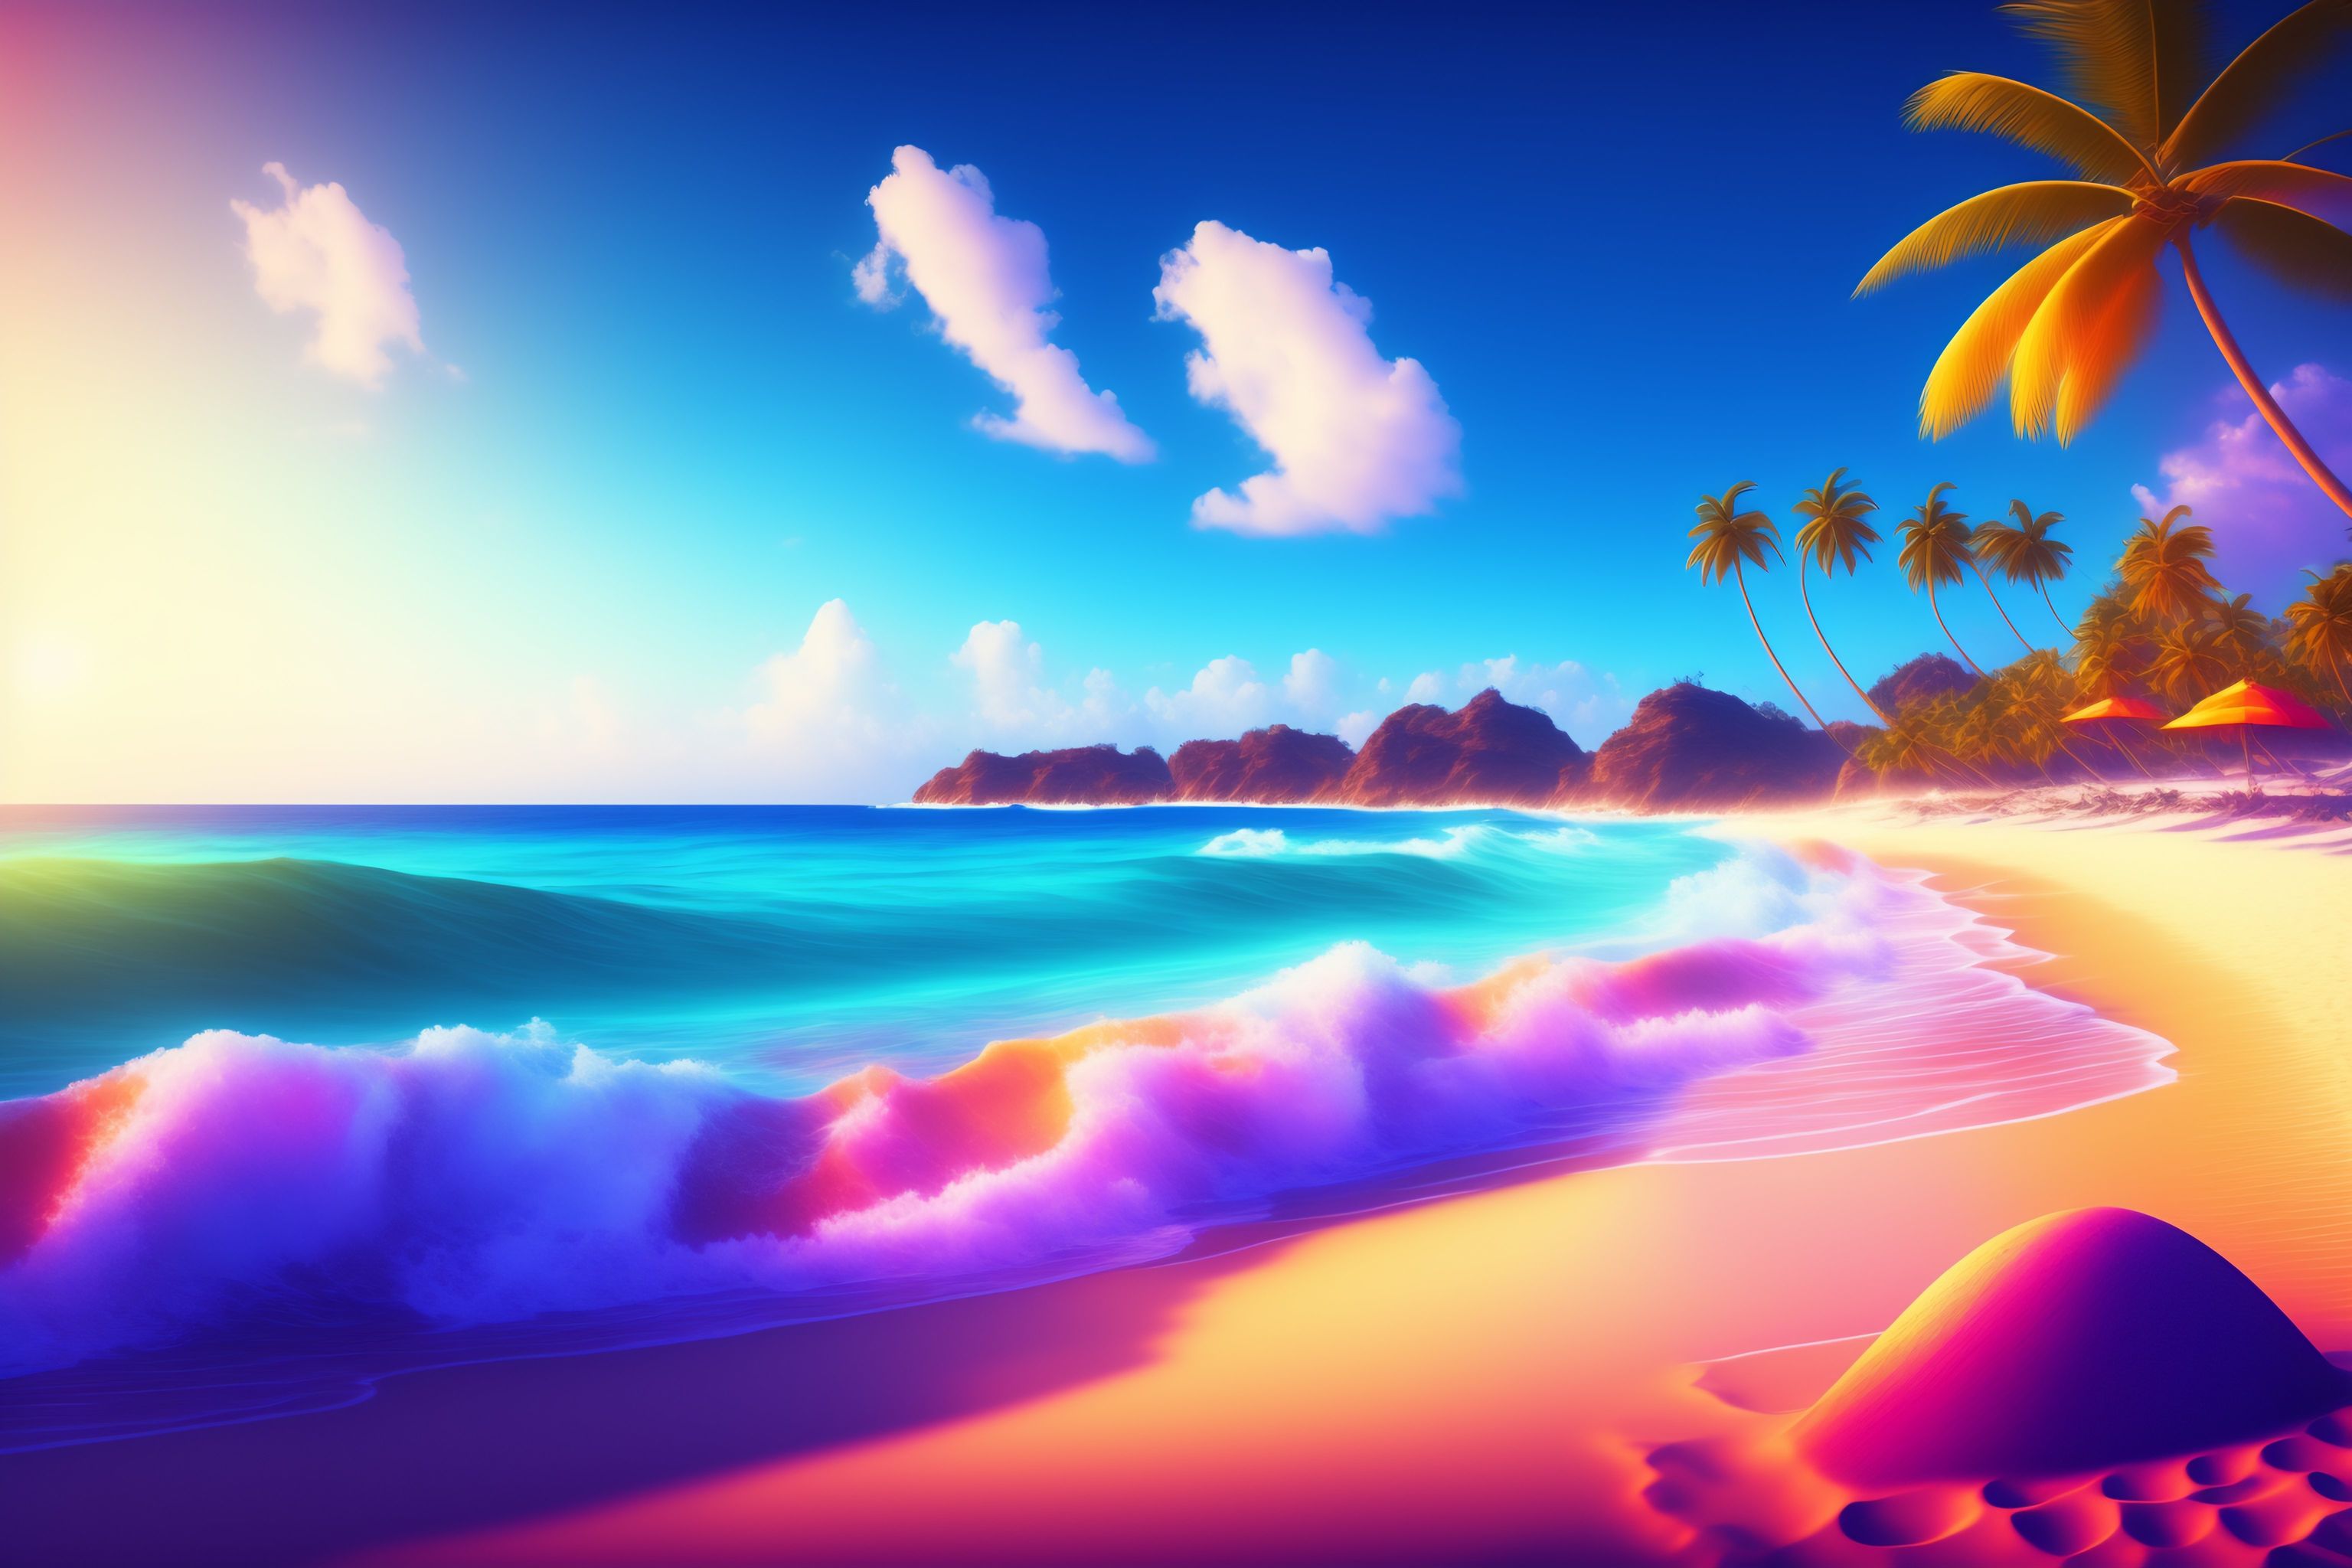
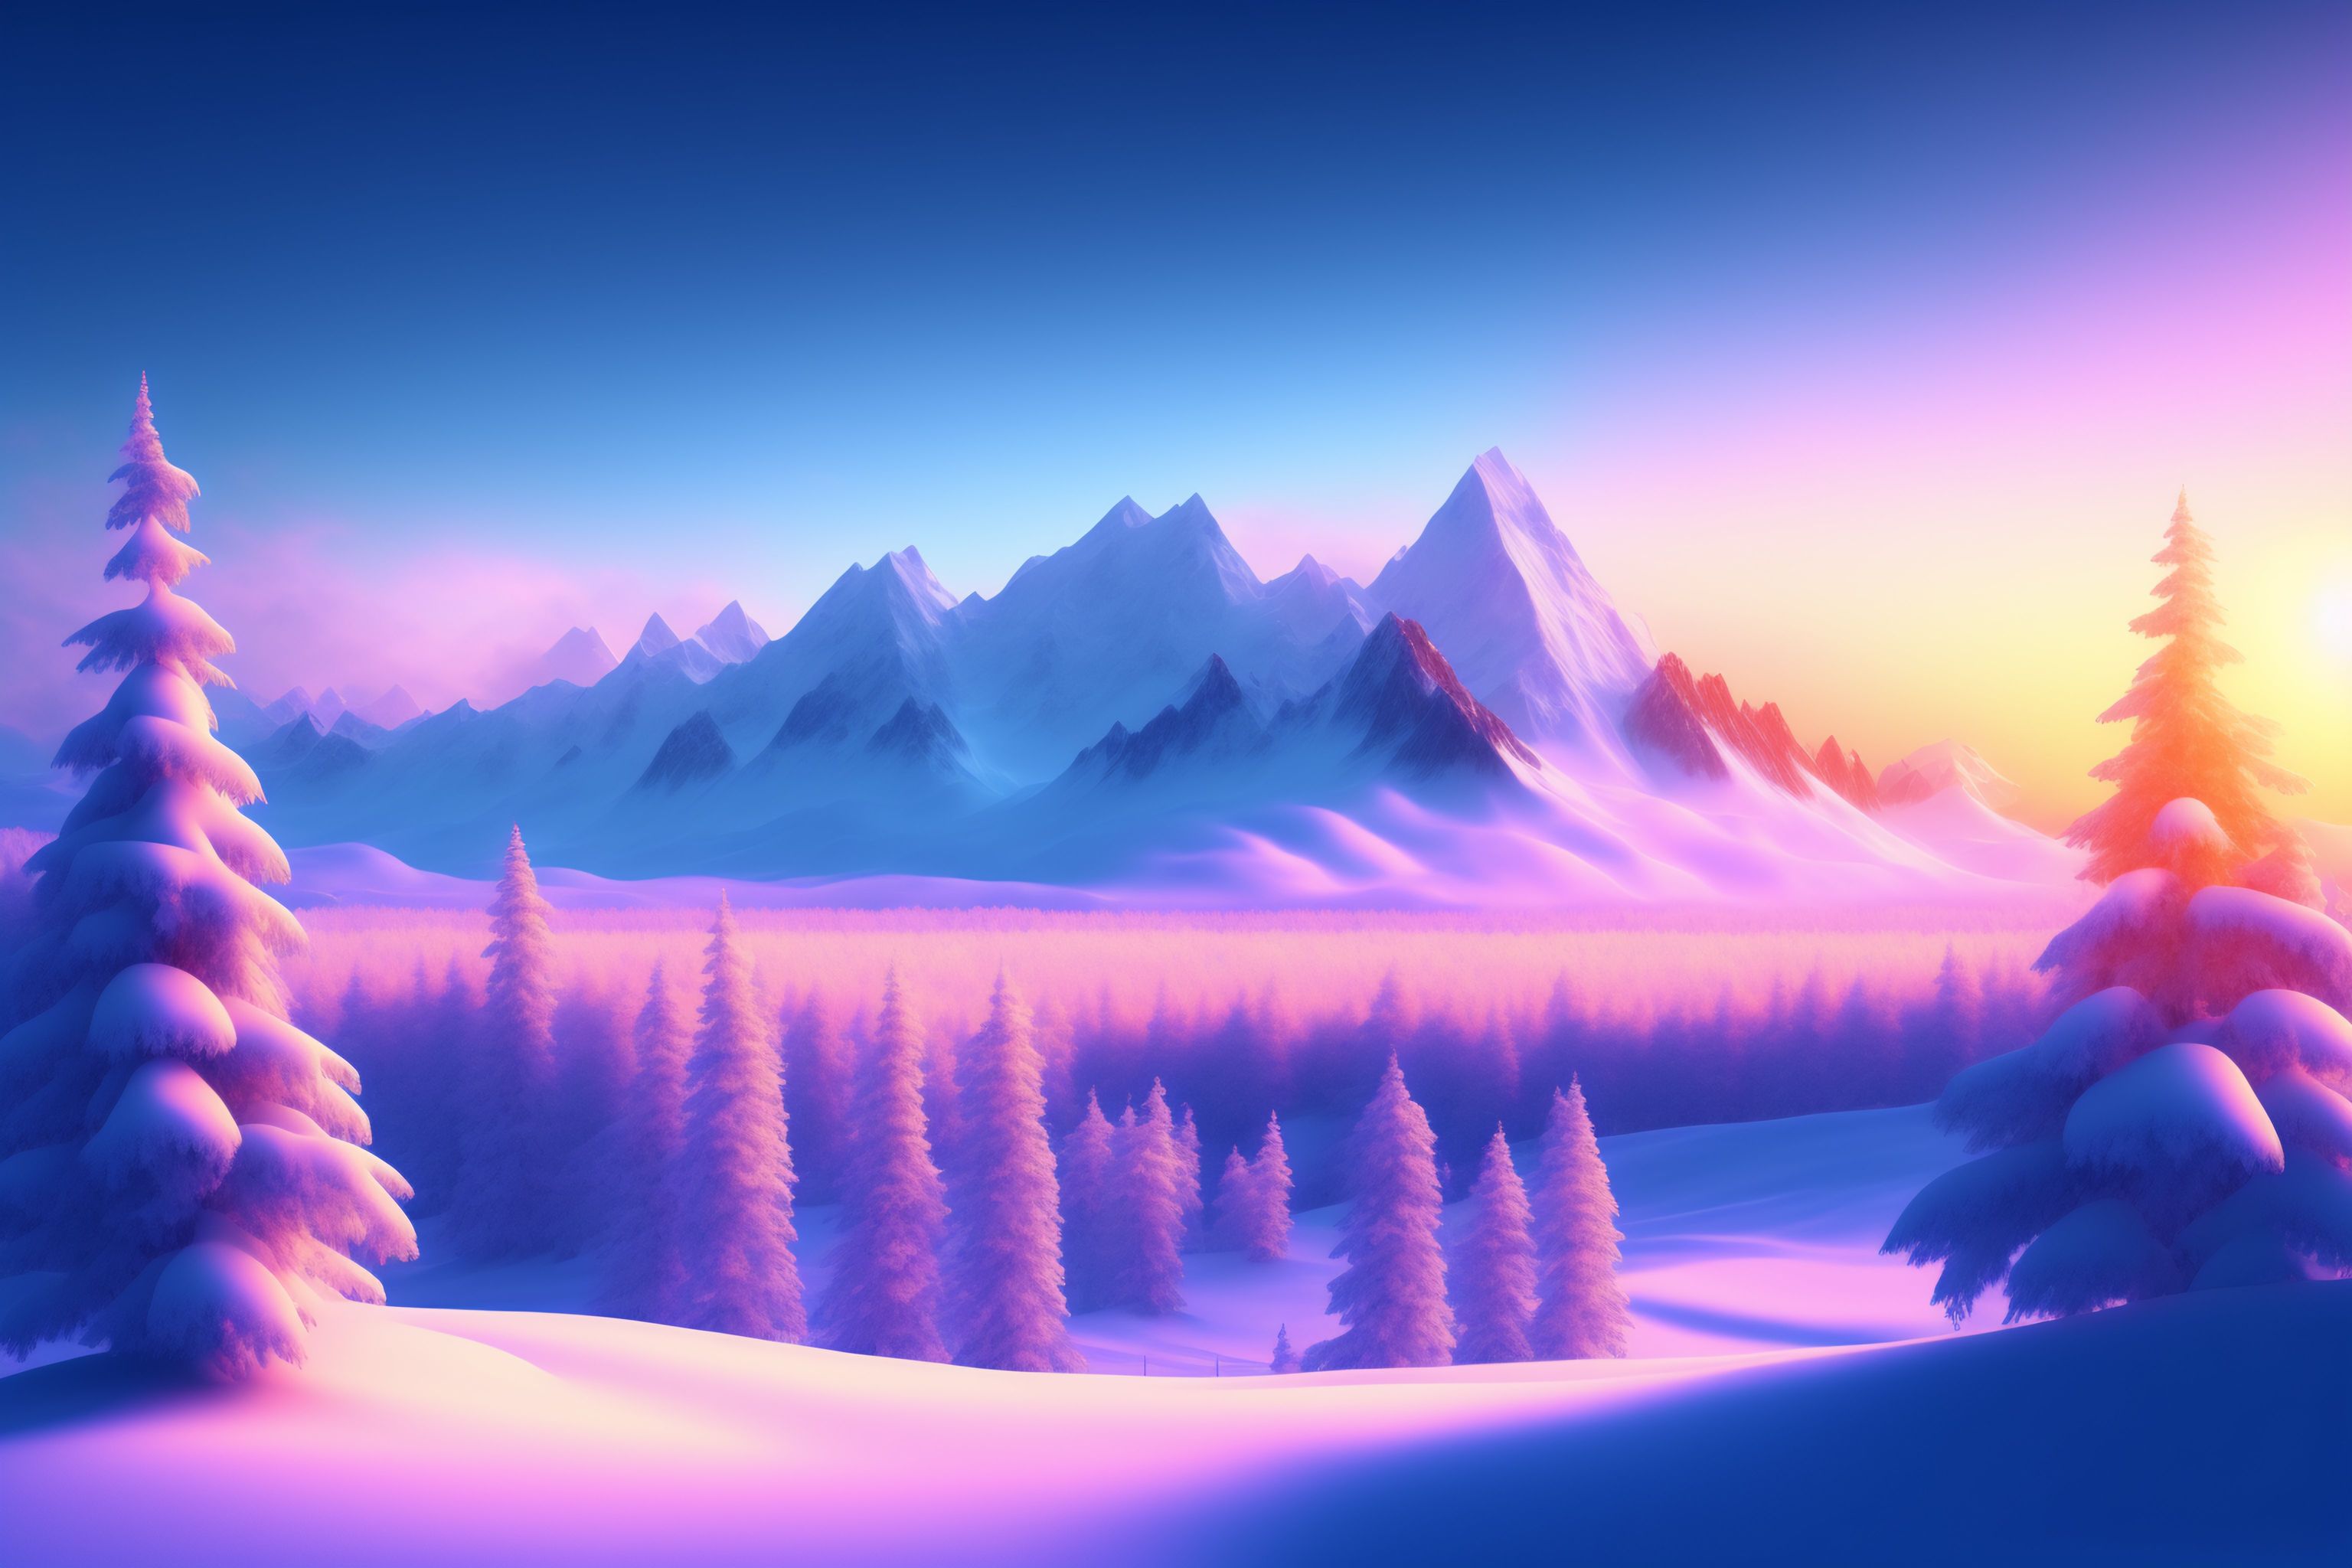
Even though I figured I love gradients, they were not enough. I wanted some pictures for a vacationy vibe. For that, and because AI is wayyyyy cooler than stock images, I headed over to Lexica. There I used their stable diffusion image generation tool. To have a somewhat consistent style, I kept generation prompts similar when describing the style and only changed up the scenery parts.
With the following prompts (spelling and grammar errors included), I got the following examples
bay landscape looking at ocean with waves beach, left and right high mountains with snow on top, hawaii, cheerful, bright colors 3d uhd rendering anime
or
Mountain range, snow, winter Anime, 3d, UHD, realistic, bright, vivid fun colors
You get the idea. The whole thing was a ton of fun to play around with. You can head over and generate a couple of examples on Lexica before you have to sign up for one of their plans (or use another account, idk).
More Gradients
Did I mention I like gradients? I implemented a trip page that uses the pictures generated as cover images. Because I wanted the text on them readable irrespective of the colours of the underlying pictures I used a semi-transparent black radial-gradient overlay.
To make the trips pop on mouseover, I switched this gradient from black to white on :hover , scaled the image up, and increased its shadow opacity.
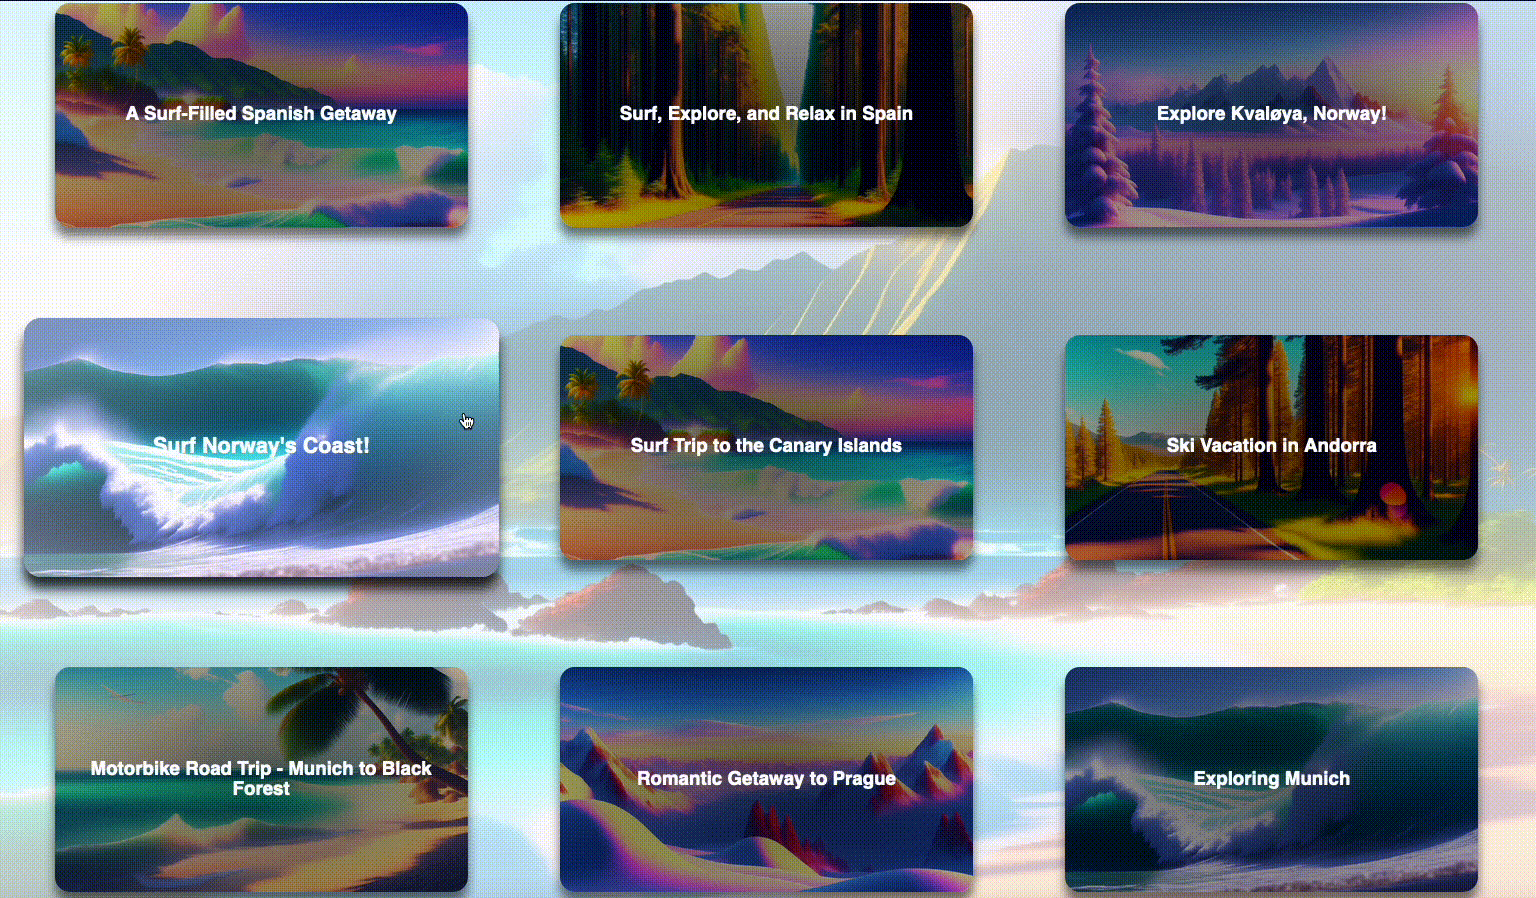
Popping trips on mouseover
The whole .css looks like this
.gpt-response,
.gpt-response-highlighted {
  background-position: center;
  background-repeat: no-repeat;
  background-size: cover;
  position: relative;
  color: white;
  display: flex;
  align-items: center;
  justify-content: center;
  text-align: center;
  padding: 3%;
  margin-top: 15%;
  border-radius: 15px;
  overflow: hidden;
  height: 200px;
  box-shadow: 0 10px 10px rgba(0, 0, 0, 0.5);
}

.gpt-response:hover{
  cursor: pointer;
  box-shadow: 0 10px 10px rgba(0, 0, 0, 0.8);
  transform: scale(1.15);
}
The first four arguments make the image fill out the whole tile. Then I specify the font colour as white, make it nice and square and fix the shadow. On :hover we have a pointed cursor, a more prominent shadow and an increased size.
But wait, where is the gradient?
I wanted dynamic background images which are not supported in .css (or I did not figure out how). So I styled that part in the react component itself like so
style = hover ? {
    backgroundImage: `radial-gradient(rgba(0, 0, 0, 0), rgba(253, 252, 252, 0.5)), url(${response.backgroundImageURL})`}
      : {
    backgroundImage: `radial-gradient(rgba(0, 0, 0, 0.6), rgba(0, 0, 1, 0.25)), url(${response.backgroundImageURL})`,
        };
where the url(${response.backgroundImageURL}) fixes the image file path that is overlayed by a radial-gradient that goes from white to transparent when hovering or from black to transparent if not.
Dynamic background images
As you can see, I am having dynamic background images. Initially, I planned to use the prompts of the images and the search queries, calculate their respective similarities and choose fitting images for trips. I even implemented a PoC in a Jupyter notebook that uses SpaCy and semantic vector embedding. I am somewhat proficient with NLP since I took a course on that at university. However, the implementation of that would mean the implementation of a Python backend which I want to learn - but at this point, I don't want to sink too much more time into this project but bring it off localhost.
So you have to live with random image generation and a big wave being the cover image for "Exploring Munich". Oops.
But maybe I will do some NLP stuff in the future.
It looks shit on mobile
At this stage, I realised that the application looks shit when using a mobile screen. I used percentages in the .css files and switched it up again to have fixed pixel sizes. Honestly, I have not figured out the responsive design yet, but at least the app looks better than when it's unstyled.
Additionally, loading the resources takes quite some time. I am unsure whether that is because I use the free plan on the service I use for hosting, or I should just use better assets. But this is something I would improve if I did not want to move on from this project.
Going Live
For deployment, I use Railway which automatically deploys a build from my GitHub's main branch. You can visit the app here. It will work until my openai credits run out.
There are still a lot of things that I could improve. For example, the lightbulb that serves as the submit button is not centred since it is not centred in the .png I am using. And generally, the page still does not look as sleek as I would like it to - especially on mobile.
But it is shipped. That's what matters.
At first, this project was very exciting. I learned a lot of new stuff and the list of things I wanted to implement grew. A major hurdle, however, was to keep it manageable and exciting at the same time.
Since I am doing this besides my job, social activities, sports, and whatever else life throws at me it was difficult at times to find time for the project. It becomes familiar, other things become seemingly more exciting. Should I look into that course, or build this other app idea?
At the same time, there are frustrations. Especially with .css which seems so easy. But then I wanted to make a quick change which then took hours to complete. But hey, sometimes learning is painful.
So in the end, I slashed some of the things I still wanted to implement, like the NLP-based picture selection in favour of getting it done, shipping the app in the state it is in, and writing this blog post.
I have learned a ton and now I can peacefully move on.
What are you building right now? When do you consider something done? When do you ship? And how do you stay motivated?
Cheers,
Max
By the way, I am using this blog as an accountability tool for myself. So there will be more posts in the future in case you want to hop along.

